
Creating the Template.
Coming up with the template for your Hollow Wooden Surfboard is the most difficult part of building your surfboard. We eliminate this difficult step of the process and provide you with the templates for purchase in our online store. We can also provide a custom template for you but the turn around time for this depends on the size of the surfboard and our current workload around the shop. Contact us directly to discuss your project for pricing and availability.
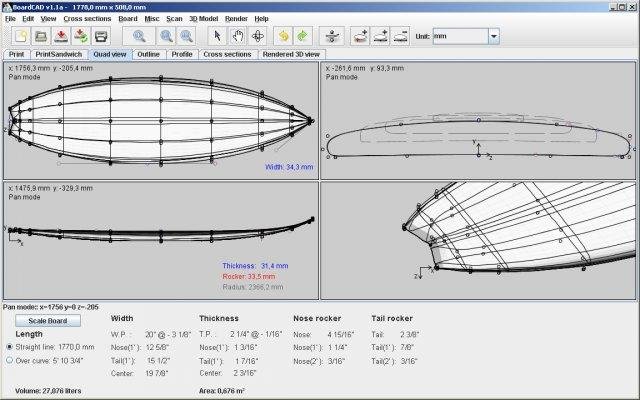 For our templates, we first start out designing our surfboards in the BoardCad™ program. We select the base template for our surfboard and set the desired dimensions such as length, width, and thickness. Next, we modify the curves along the outline and set the rocker for both the nose and tail. Then use the default cross section profiles to modify the top and bottom contours. This is where we shape the rails, decide how flat we want the deck, and where we want our concaves or v-shaped bottom. If you are doing this yourself, pay close attention to the volume calculator and adjust the shape accordingly. Once we have our board “shaped” with the BoardCad program, it’s time to check it in the virtual shaping room which is a 3D rendered model of our surfboard. If we like what we see, it’s time to start adding the cross sections or ribs. Once the ribs are added, it’s difficult to modify the board so this is the last step before saving the final .brd file.
Now that we have our desired surfboard in BoardCAD, it’s time to save the PDF templates using the Hollow Wooden Surfboard print option that is available in the software. We then take these files and import them into our image manipulation program to piece these all together and convert the template to fit our method of building hollow wooden surfboards. With our build method, we create the bottom and top support templates that will maintain the desired rocker profile. These boards are pressed with great amounts of pressure and without the top and bottom supports, the planned rocker will get pressed out so this is an essential part of our build method.
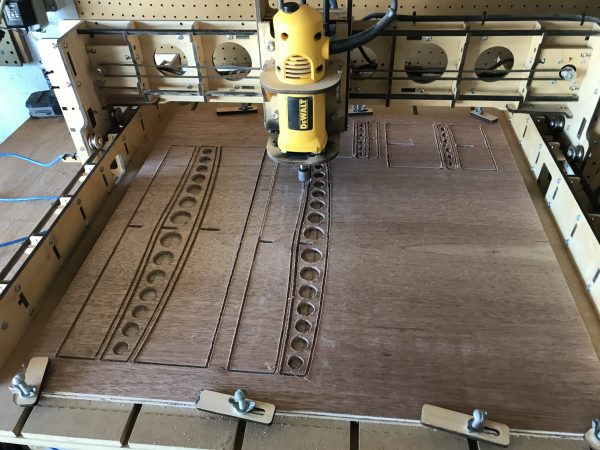 Once the template is ready for production, it must be converted to g-code format for our laser CNC cutter. These templates are available for purchase in our online shop. If you cannot find the template that you would like to use to build your own hollow wooden surfboard, you can contact us directly to develop a custom template.
List of Necessary Tools and Supplies:
| Tools: | Supplies: |
| Respirator mask | Raw cut wood (cedar, spruce, paulownia, balsa, etc.) |
| Ear Protection | 1/8″ Cork roll underlayment (optional) |
| Table saw | Pine 2 x 4’s for support |
| Jigsaw | 3/4-inch plywood (ripped lengthwise) Two 2′ x 8′ pieces |
| Knife | Wood glue sticks |
| Orbital sander | Lots of tape |
| Belt sander with 80-120 grit belts | Plastic wrap |
| Hot glue gun | 4-oz fiberglass cloth |
| Various clamps | Vector carbon fiber fiberglass cloth (optional) |
| Hand drill | Epoxy resin with medium and fast hardener |
| Router | Mixing buckets |
| Scale for mixing epoxy | Epoxy spreader |
| Cheep paint brushes (sponge and bristle) | |
| Fin boxes with fins | |
| Leash cup | |
| Air vent with plug |
Wood Selection
The top and bottom skins of the surfboard are planked using a combination of cedar, spruce, and/or balsa wood. You will want to visit your local lumberyard and spend a few hours picking the clearest (knot free) boards you can find. We have much better luck at the lumberyards than at the hardware stores. Finding quality lumber is very important because trying to rip planks from boards with knots in them is not recommended. As far as wood selection goes, balsa if the least dense (lightest) of all the woods that we use however is more expensive, easily damaged (dented or dinged before glassing), and harder to get. Once you have purchased the raw cut lumber you will need to rip 3-4mm planks using a table saw. Once you start ripping planks, don’t stop until you have all the wood you need to skin the deck and bottom of the board because it is very difficult to get the table saw gate set exact as you had before. Also, if the board you are building is longer than the lumber you are able to purchase, than you can include a chevron into the design of your board which may actually make it look better. The possibilities are endless depending on your experience.
Build the Inner Frame and Press Supports
All the fame parts are labeled and easily assembled like a 3D puzzle. However before putting the frames together, we need to create a flat and strong surface where we build our surfboard on. To accomplish this, we use the pine 2×4’s and 3/4 plywood to make the table. Then length of this table will depend on the length of the hollow wooden surfboard that we’re building. To do this, we put two 2×4’s under the 2ft x8ft wide plywood to give it more support and to get the edges of the plywood off the floor. The other 2ft x 8ft sheet of plywood will be placed on top of the upper frame during the pressing process while the epoxy cures. After the inner frame of the surfboard is put together, it is a great idea to seal the wood to protect it just in case water was to ever get into the surfboard. For our boards, we mix some epoxy and paint the frame with a sponge brush.
Laminate the Wood Strips Together
Once the wooden strips are cut, lay them out on the floor and arrange them in the desired pattern with the good side up and tape them together as tightly as possible. Once the strips are taped together to form the skin, it is flipped over and laminated with fiberglass and the optional vector carbon cloth. Before that however, the outline of the surfboard needs to be cut out with an approximate 2 inches over overhang using the template outline. At the ends of the strips, it a good idea to hot glue some leftover pieces of wood to make sure the tape joint does not separate and split under the high pressures of pressing the surfboard “sandwich.” This all depend on how complex the curvers are of the surfboard that getting pressed. The more rocker and curve there is, the longer the overhang needs to be and it becomes critical to hot glue the leftover pieces of wood to hold the tape joints together. Before laying out the glass cloth and laminating, the taped side of the decks needs to be covered with plastic wrap or cellophane to make sure the surfboard will properly release from the support frames. Epoxy will inevitably seep through and around the tape joints and without this plastic protective layer, the support frame could get laminated to the decks. Now flip both the bottom and top decks with the tape side down. There is no need for gluing the strips together because epoxy resin is very fluid and will flow between the strips of wood and form a strong enough bond to hold the deck together.
** NOTE: Timing is critical here! **
We are now ready to glass the inside surface of the decks. Roll out the fiberglass cloth over the skin and trim the edges. Now measure using the scale and mix a batch of epoxy and pour the entire mixture along the stringer and wet out the fiberglass cloth to both the bottom and top decks. Allow the skin to setup and become tacky but not dry yet because you’ll want the frame to attach to the decks in the press before it cures. It’s now time to build the surfboard sandwich and press the decks to the inner frame.
Trim Edges, Build Rails, and Add Tail/Nose Blocks
 Now that both the deck and bottom skins are attached to the inner frame and completely dry, you will need to trim the edges down after drawing the outer edges using the outline template that is provided in the kit. If you are going to use a jig saw, be extremely careful because it could damage the surfboard quickly. We prefer using a Dremel with a carbide saw wheel that cuts the outline of our surfboards quite well. After a rough cut of the outline, use the belt sander to level and smooth the edges. ( *** NOTE: before closing in the board, determine approximately where the vent plug will go and add a small hole so air can flow in/out of the board. Failure to do this could result in deck separation from the frame due to drastic temperature changes once the board is closes in.) Now start adding strips of wood to build up the rail alternating from side to side and top to bottom. These strips should be about 1cm wide by 3mm thick. Any more than that will make it difficult to bend the strips around the curves of the surfboard especially if the board has a lot of rocker. The best way to attach the strips of wood, is with wood glue and lots of tape to hold them while drying. Using the hot glue gun is also a great way to attach these strips of wood to speed up the process just make sure it is wood specific glue (if not, sanding will be difficult and a mess). While building up your rails, you need to keep in mind the type of rail you will be shaping because you don’t want to sand through it when it comes to shaping the rails.
Shape and Sand into a Surfboard
The shape of the rails determines how water flows when the board is planing and turning. Different shapes have different uses. Rails are thickest towards the center of the board and thinnest at the tail and nose. Fuller rails are thicker providing more floatation when leaned on edge. Thinner or tapered rails aren’t as thick making them easier to sink when on edge. Now the harder the rails edge the cleaner the water breaks away from the board which contributes to speed and looseness. Hard rails penetrate the water poorly at high speeds and resist be leaned on edge while softer rails provide a smoother more forgiving response. If you’re new to shaping, you would be better off copying the rails on an existing board.
Install the Leash Cup, Air Vent, and Fin Boxes
Determine where the leash cup and vent will be located and use a router to cut into the deck of the surfboard. Mix up some epoxy with quick hardener and add the pieces of wood that will hold these components of the surfboard. Now flip the board over and determine where the fin boxes will go. Use the fin box blocks of wood and trace the outline of these blocks on the bottom of the surfboard. Next using the router again, cut out the area for these blocks. The inner frame may also have to be cut out in these areas in order for the block of wood to fit properly. The inner fiberglass will also need to be roughed up so that these blocks can be laminated to the deck and make the fin boxes extremely strong. Again, mix up some more epoxy with the quick hardener and install the fin box blocks of wood. Use some scrap fiberglass cloth so that the block will laminate to the inside of the upper deck. This will create a very strong fin box. Once the epoxy for the blocks has cured, use the router to install the leash plug, air vent, and fin boxes with fast hardener. After these components have cured sand them down to be flush with the surface of the surfboard.
Fins have a huge impact on the maneuverability, stability, and drive of a surfboard. Fin placement can dramatically affect the performance of a surfboard and completely alter the way you experience surfing. Depending on personal preference, the number of fins, the placement relative to each other, and the location of the fins will affect how well the board turns and it’s drive down the line. Moving the fins forward tends to make the board more loose and makes it turn easier. Moving the fins re-ward will make the board more stable with increased drive. It’s also worth noting that the closer the fins are to each other, the looser the board will be. The further apart the fins get, the harder the board will be to turn by increasing it turning arch or radius however this will make the board more stable.
See the table below to better understand fin placement:
| Fin Setup | Characteristics | Conditions |
|---|---|---|
| spread out fin cluster | longer turning arc, more common on longer boards or guns | larger faster waves, situations where a gun would more likely be used |
| compacted fin cluster | shorter turning arc, the common setup for smaller thrusters | wide range, depending on skill and the shape of the board |
| fin setup forward | looser, shortest arc, less hold | pivotal surfing on small to medium waves |
| fin setup normal | loose with control, typically the position designed by the shaper | versatile wide range of conditions |
| fin setup back | more control, shorter arc | bigger, tube/pocket waves, once again typical for situations for a gun |
| more fin cant | looser with less drive, requires more turning to generate speed | small to medium surf |
| less fin cant | stiffer with more drive | bigger, faster hollow surf, commonly used in twinnies, guns or toe-in boards |
 Toe-in – With a 3 fin or thruster fin set-up, the outer fins are slightly angles towards the nose and this is referred to as toe-in. Toe-in is normally set ¼” to ½” (but no more than ½”) difference between the trailing edge and the leading edge of the fin. For some boards, toe-in is such that a string from the nose of the board to the fin will align with the fins toe-in. Toe-in causes pressure on the outside of the fins to be greater than on the inside which makes the board want to swivel to either side with little surfer input making for a looser and more responsive board. Toe-in also helps the board during bottom turns by keeping the rail engaged with the wave.
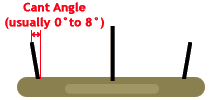 Cant (rake) – In multi-fin systems, the outer fins are angled toward the rails between 0° and 8°. Cant along with toe-in gives lift at the nose by sucking down the tail, however it increases drag and slows the board down. Cant also puts the fin where it needs to be when you are doing a bottom turn, the inside fin of the turn is angled out toward the rail and is in a better position to hold the board in the turn. This makes the board handle better on its rails.
 Because the fin plays an important role in the way the surfboard reacts to waves, it is essential to mark the fin placement correctly. Use the fallowing steps the help you properly install the fins to your board.
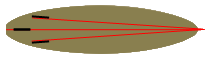
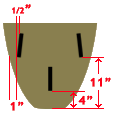
- Find the exact center or “stringer line” of the surfboard and lightly draw a 2ft line from the tail towards the nose. This line will be sanded off before the glassing process and will not be seen.
- Use a T-square to draw a “cross line” four inches up from the tail. This is the mark for the back edge of the center fin or fins if you prefer a twin-fin. You can adjust this cross line forward or aft depending on your preference.
- Place the center fin on the stringer line, with the back end lined up flush with your cross line. Be certain the fin is lined up parallel with the stringer line, and then make a small mark at the front of the fin on the stringer line.
- Measure 11 inches up the stringer line from the tail and draw another cross line.
- Mark side fin placement from the second cross line, six inches out from either side of the stringer line. This marks the back of your side fins. If you prefer a wider side fin placement, mark one inch from the rail line.
- Line up the back of the side fins with each mark on the cross line.
- Now toe-in the side fins a half inch. Mark the front edge of the fins and remove. You now have fin placement marks and are ready to permanently attach the fins using a glass-in or removable fin system.
Glassing
Safety first… make sure you have a respirator mask and plenty of gloves even though epoxy is less toxic than polyurethane resin. This is a very messy process of creating the board. You will also want to protect your floor with plastic because the resin will run off the board to the floor.
Before glassing, the boards are pre-coated with epoxy that is thinned with 25% denatured alcohol for a faster flow. The DNA evaporates fast and the epoxy sets off just fine. This step is not required however, it seals the wood so that it does not pull epoxy from the glass and there are less outgassing bubbles as the glass sets up.
Once you have the board shaped and ready for glass, you will need to tape off the fin boxes, leash plug, and drain hole. You will glass each side of the board (deck and bottom) separately, starting with the bottom using either the freelap or cutlap method. If you decide to use the cleaner more advanced cutlap method, you will need to tape off the railes of the board evenly on both sides allowing the lower edge of the tape to hang down off the rail so that the resin to drip off instead of running around the board to the deck. Before the resin is hard and dry, the tape and excess glass is cut off using a sharp blade at the edge of the tape giving you a clean lap line. Once the resin is completely dry, lightly sand the lap line and you are ready to repeat the process on the other side of the board. The freelap method will not require the taping of the edges because you will squeegee the resin and cloth around the rail to the deck. This method is quicker and more difficult to master but will require more sanding once the resin has dried before glassing the other side.
After the board is “dressed,” lay the fiberglass cloth over the board and cut the excess cloth from the sides leaving about 4-5 inches to hang over the sides of the board to lap over the rails. You will also want to be wearing your respirator mask when cutting the fiberglass cloth so that you do not inhale tiny fibers that may become airborne.
Next pour the resin down the center of the board and squeegee it out evenly. Work it around the rails, tail, and nose so that the glass is smooth all the way around the rails and touches the tape skirt. Allow the resin to become tacky almost hard and pour another batch of resin to fill the weave of the cloth and hot coat the board. Doing this before it completely dries saves time and will allow the layers of resin to chemically bond which is stronger than having to sand or rough-up the surface between the layers of resin.
Final finish
Now that the board has been glassed it will need a final sanding and sprayed with UV Clear to protect the board and give it a finished look. Using 80 grit sandpaper, even up the glass lap lines at the rails and remove any high spots then continue sanding the rest of the board with 100 to 150 grit paper and gradually work to 220 grit for final sanding. Block out the glass until there are no shiny spots. Shiny
spots are low spots and will show when the board is finished. Once the board is completely sanded and there are no lumps, gouges, low spots, high spots etc. it will have a milky white appearance from the millions of fine scratches in the hot coat made by the sandpaper. The gloss coat will fill these scratches and make the glass perfectly clear.